Spack Lora Sat Groundstation Workshop

Spack Lora Sat Groundstation Workshop
Workshop for the construction of a LoRa satellite tracking mini-station based on the project https://github.com/G4lile0/ESP32-OLED-Fossa-GroundStation of @Galile0
Overview
Workshop guide for installation and monitoring of a TinyGS for SPACK
This repository contains the code, information and the necessarydocumentation to make a satellite signal mini-receiver with LoRa modulation.
<img src="https://github.com/G4lile0/tinyGS/blob/master/doc/images/TinyGS_architecture.png" width=300 align="left" />This kind of receiver is based on standards of the project TinyGS created by:
TinyGS is defined as an open network of ground stations distributed around the world to receive and operate LoRa satellites, meteorological balloon and other flying objects, using inexpensive and versatile modules. Unlike others, it does not require extensive knowledge in telecommunications or amateur radio licenses. It is oriented on the one hand to the participation of people in the Maker world without great technical profile. And on the other, to provide service to satellite operators receiving telemetry and other data in real time thanks to the worldwide deployment of the network of these stations.
The TinyGS network is growing exponentially and is destined to play an important role in the strategy of public and private mini-satellite projects.
</br> </br> <img src="./img/Photo 8-11-20, 12 58 03.jpg" width=300 align="right" />Construction of the receiving station
Hardware configuration
In choosing the microcontroller there are many options. For the workshop we have chosen the TTGO LoRa32 V2 (433MHz) In addition to this board you will need the following:
- A Telegram user
- WiFi network
The installation procedure is constantly evolving. For this reason we list the main blocks without going into details. For more information, consult the links.
-
Get the platform credentials (MQTT). For this you will have to access the Telegram BOT: @tinygs_personal_bot:
<img src="./img/start_bot.png" width=400 align="center" />
Assembly
Como soporte a la placa del microcontrolador tenemos dos opciones::
-
For indoor use: 3D case:
<img src="./img/TTGO_LoRa32_case3D.png" width=300 align="center" /> -
For outdoor you can use Sonoff relays case:
<img src="./img/sonoff_case.png" width=300 align="center" />
The ** antenna ** is the key piece that you will have to pay attention to frequently. Because it will require regular reorientations and changes based on the satellite that you have as reception priority. There are multiple options, from the most DIY to commercial already calibrated that you can buy online:
-
Dipole, it is a simple antenna composed of two elements and easy to build::
- <img src="./img/antenna_dipole3D.png" width=300 align="center" />
-
Rabbit Ear (por @estbhan)
<img src="./img/antenna_rabbitear.jpg" width=300 align="center" /> -
JPCoax (por @kreatif)
<img src="./img/antenna_JPCoax.jpg" width=300 align="center" /> -
Aliexpress 400-433 MHz It seems that its sensitivity is improved by using some extension screws.
-
Quarter wave antenna (a.k.a ground plane)
-
Cellular antenna, generally dual band ham radio 2m/70cm
-
Directional: Antenna Yagi de UHF430-450MHz
Control and monitorization Dashboard (NOC based Node-RED)
The TinyGS backoffice publishes two topics with information about your station. This control application is based on the subscription to them:
tinygs/[user]/[station ID]/cmnd/begin
tinygs/[user]/[station ID]/cmnd/frame/0
Node-RED is a visual programming tool. It graphically shows relationships between objects (nodes) that are functions that transform the message that arrives from the preceding nodes (a flow). Using standard nodes, programming is not required. Although if you want, you can create functions by programming in JavaScript. In short, it allows, from a web browser, to build flows to process information and communicate it through countless integrations.
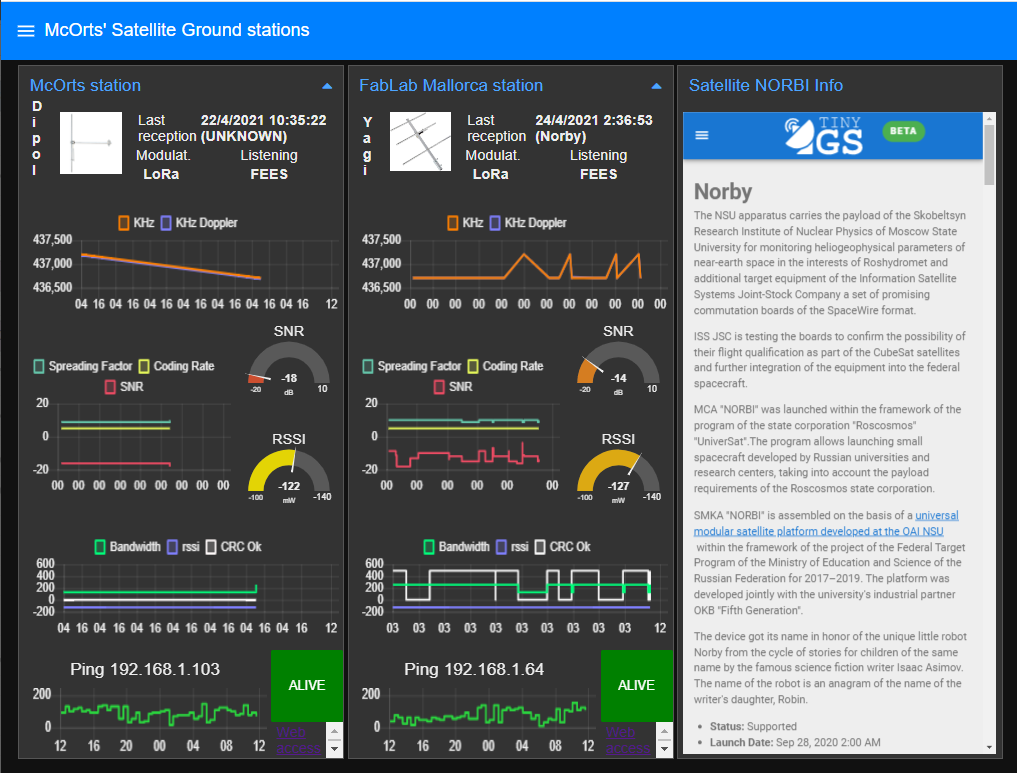
We are going to mount a dashboard that will allow us to monitor up to two TinyGS stations. It is our personal NOC that will allow us to:
- Know which satellite we are listening to.
- What was the last satellite received
- Know the configuration values of the modem.
- Analyze the received signal through the history of the RF values.
- Receive notifications:
- Receiver down. Won't connect to WiFi network
- Satellite received.
Node-RED
First we will need to have [a Node-RED instance installed] (https://nodered.org/docs/getting-started/). The most current recommendation is to do it in a Docker container. But using a Single Board Computer like the Raspberry Pi is very suitable because the memory and processing capacity requirements are very low.
<img src="./nodered/nodered_instalation.png" width=500 align="center" />We are also going to need some 'nodes' in addition to what the installation includes.
- node-red-dashboard It provides us with the nodes necessary to build the user interface.
- node-red-contrib-ui-media It allows us to show the images in the User Interface
- node-red-node-ping A Node-RED node to ping a remote server, for use as a keep-alive check.
IFTTT
To receive alert we are going to use the service If This Then That which will be easily integrated into Node-RED using the HTTP request node.
https://maker.ifttt.com/trigger/TinyGS/with/key/[clave de IFTTT]?value1={{{payload}}}
The service to configure is simple. We will use the Webhooks component to capture the event and the notifications so that the notice is triggered on our device: mobile, smartwatch ...
Links and references
Files in this package
- CAD source: 18650Back.stl, 18650Front.stl, 90-degrees-braket.stl, Articulating_Mount_v3_pin.stl, Articulating_Mount_v3_shortarm_90_m.stl, DipoleAntenna.stl
- Images: MapaTinyGS_Kenia.jpeg, TTGO_LoRa32_case3D.png, TinyGS_map_Kenya.jpg, antenna_JPCoax.jpg, antenna_dipole3D.png, groundstation2x-min.webp, ifttt.png, loading_firmware.PNG, nodered_instalation.png, sonoff_case.png, start_bot.png, tinygs_logo.png
Source & license
- Original author: McOrts
- Source repository: https://github.com/McOrts/spack-lora-sat-groundstation_workshop
- License: MIT
Imported into the CommunityCAD Archive with attribution preserved. All rights remain with the original author under the stated license.