3D Printed Myo Electric Prosthetic Hand

3D Printed Myo Electric Prosthetic Hand
Welcome to 3D-printed Myo electric prosthetic hand Project. In this project we will build a bionic arm which can be controlled using myo electric sensors.
Overview
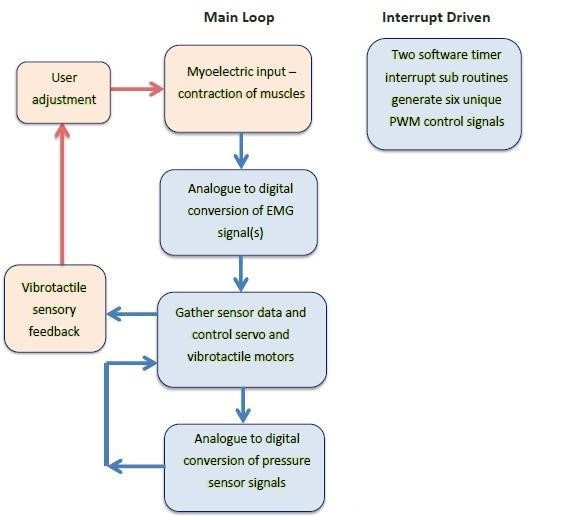
<h1 align="center">Welcome to 3D-printed Myo electric prosthetic hand Project 👋</h1> <p> <img alt="Version" src="https://img.shields.io/badge/version-v0.1-blue.svg?cacheSeconds=2592000" /> <a href="https://github.com/TheForgotensoul/3D-printed_Myo-electric-prosthetic-hand" target="_blank"> <img alt="Documentation" src="https://img.shields.io/badge/documentation-yes-brightgreen.svg" /> </a> <a href="https://github.com/TheForgotensoul/3D-printed_Myo-electric-prosthetic-hand/blob/master/LICENSE" target="_blank"> <img alt="License: MIT" src="https://img.shields.io/badge/License-MIT-yellow.svg" /> </a> <a href="https://twitter.com/theforgotensoul" target="_blank"> <img alt="Twitter: theforgotensoul" src="https://img.shields.io/twitter/follow/theforgotensoul.svg?style=social" /> </a> </p>This project illustrates how 3D Printing enables frugal innovation and thereby addresses the needs of people who aren’t served or who are under-served due to the lack of economic power or due to the small size of addressable market. The entire project was approached as a full-time endeavour.The arm is electronically actuated and controlled by servo motors. The bionic arm presented has the potential to be used by an amputee or person born without a limb. This type of technology does exist although it is expensive and generally not available to people in developing countries.The root of the system is an innovative mechanical design for a 3D printed prosthetic hand. Modern day electronic actuators and circuitry animate the device and allow for control schemes.
🏠 Homepage
Hardware Specifications
- 5-volt LIPO battery
- NodeMCU
- LED
- Jumper wires
- Slide switch
- Servos
- PCB
Software Specifications
- Arduino
- Easyeda
- Autodesk Fusion 360
- Simplify3D
✨ Demo
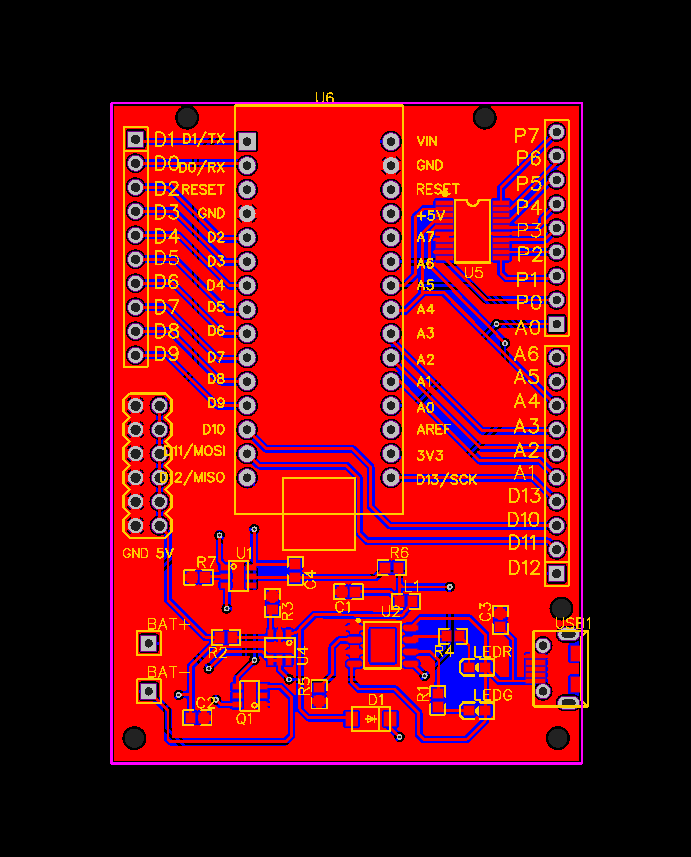
Schematic for pcb design:

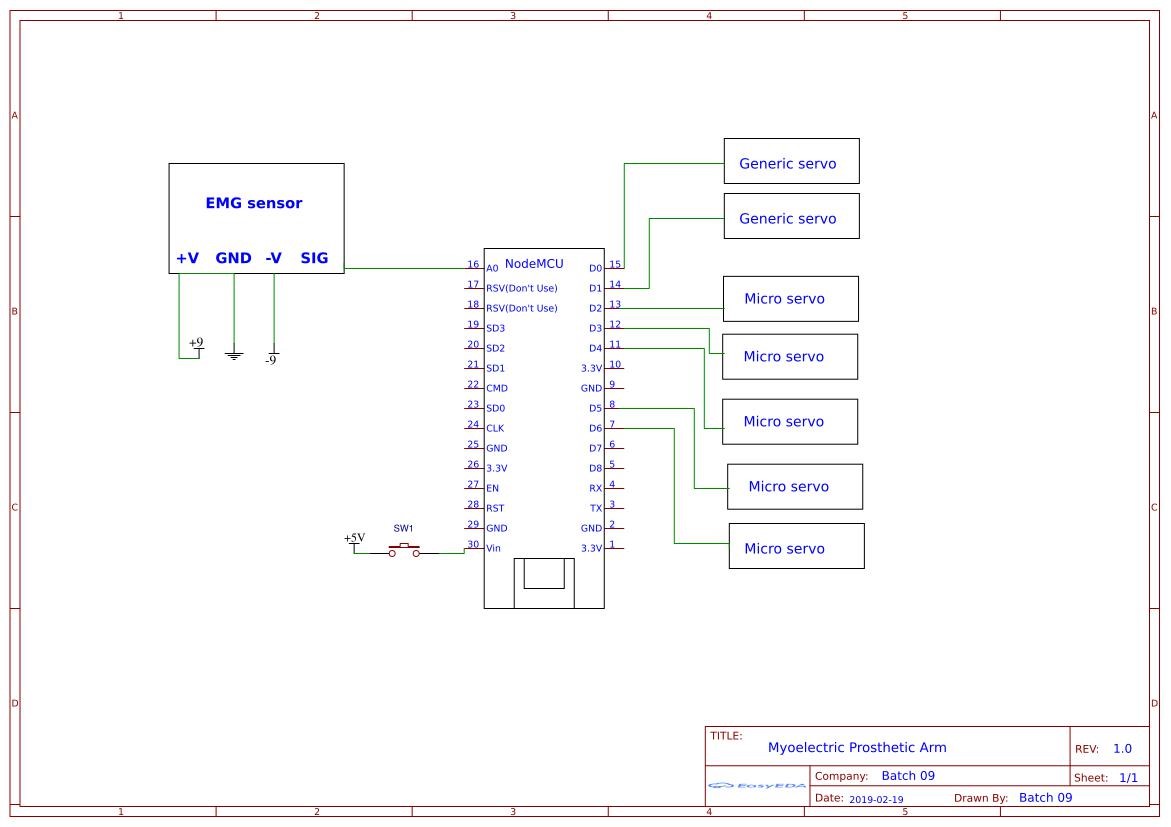
Schematic for Simple bread-board design:

Install
Usage
- READ the Documentation.
- AND change necessary feilds in "Code" before uploading to Micro-controller.
Author
👤 theforgotensoul
- Twitter: @theforgotensoul
- Github: @theforgotensoul
🤝 Contributing
Contributions, issues and feature requests are welcome!<br />Feel free to check issues page.
Show your support
Give a ⭐️ if this project helped you!
📝 License
Copyright © 2020 theforgotensoul.<br /> This project is MIT licensed.
This README was generated with ❤️ by readme-md-generator
Files in this package
- CAD source: Bicep.STL, Index Finger Middle.STL, Index Finger Tip.STL, Mid Forearm Large.STL, Middle Finger Middle.STL, Middle Finger Tip.STL, Palm _ Optimised Connector.STL, Pinky Finger Middle.STL, Ring Finger Middle.STL, Ring Finger Tip.STL, Upper Bicep Cap.STL, Upper Forearm Large.STL (+22 more)
- Images: Ed.jpg, PCB_.png, Schematic.png, final.jpg, flow.jpg
Source & license
- Original author: TheForgotensoul
- Source repository: https://github.com/TheForgotensoul/3D-printed_Myo-electric-prosthetic-hand
- License: MIT
Imported into the CommunityCAD Archive with attribution preserved. All rights remain with the original author under the stated license.